· Steve Grice · boom languages · 8 min read
NextAuth Tutorial - Google & Apple Social Login
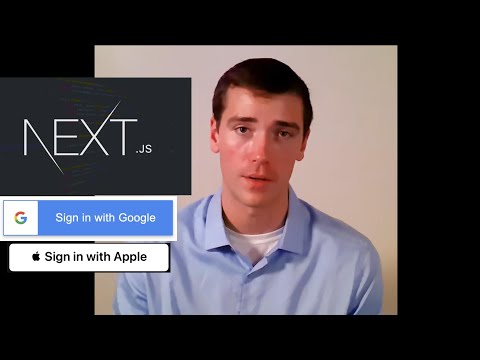
Login with Google. Login with Apple. How many times have you seen that button?
It should be easy to get social login working with your app, because these things are EVERYWHERE.
However, it’s not as easy as you would think. There are plenty of little details that are easy to miss along the way.
In this tutorial, we’ll generate a Next.JS app from scratch and configure login with Google and login with Apple.
In case you’re curious, I only figured all this out because I’m building an app called Boom Languages. You can check it out at boomlanguages.com.
Project Generation
We’ll start by generating the NextJS project. You can pop open the docs if you want to know how I figured it out, or just follow along and trust me on this one.
Run the following to generate the app:
npx create-next-app@latest pagekey-auth-example
It’s going to ask you a bunch of questions. You can answer them all with the default choice, except for one!. Be sure to not use the App Router. It doesn’t seem like NextAuth.js has particularly good support for this new router, because it’s not mentioned in any of their docs.
> TS: yes
> ESLint: yes
> Tailwind: Yes
> src: No
> App Router: No  <<<<<<<<<<<<<<<<<<<<<<<<< Very important! next-auth docs are for NOT updated for the app router
> Import alias: No
Now jump into the directory it created and start up the dev server.
cd pagekey-auth-example
npm run dev
If you visit localhost:3000 in your browser, you’ll see a fresh Next.js app waiting for you.
Creating the Buttons
Let’s create the most basic possible setup - two buttons on a page, one for Google and one for Apple.
Keep in mind that we won’t be styling the buttons in this tutorial. Google and Apple do this work for us. You can download pre-made buttons and logos from the following links:
Google branding guidelines (click “Download files” under Image Files)
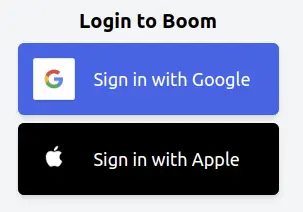
For reference, here’s what they look like in the Boom Languages app:
Start by clearing out everything in styles/globals.css except for the tailwind imports. It’ll look like this when you’re done:
@tailwind base;
@tailwind components;
@tailwind utilities;
Replace pages/index.tsx with the following, a simple page with a couple of buttons:
export default function Home() {
  const handleLoginWithGoogle = () => {
    console.log('Ouch')
  };
  const handleLoginWithApple = () => {
    console.log('Ouch')
  };
  return (
    <>
      <div className="text-2xl font-bold my-4">My App</div>
      <button className="my-2 p-3 bg-blue-600 text-white font-bold rounded" onClick={() => handleLoginWithGoogle()}>Login with Google</button>
      <button className="my-2 p-3 bg-blue-600 text-white font-bold rounded" onClick={() => handleLoginWithApple()}>Login with Apple</button>
    </>
  );
}
Create components/Layout.tsx and add the following to make it look a little better:
export default function Layout({ children }: { children: React.ReactNode }) {
    return (
        <>
            <main className='flex flex-col items-center'>
                {children}
            </main>
        </>
    );
}
Next, replace the contents of _app.tsx with:
import Layout from '@/components/Layout';
import '@/styles/globals.css'
import type { AppProps } from 'next/app'

export default function App({ Component, pageProps }: AppProps) {
  return (
    <>
      <Layout>
        <Component {...pageProps} />
      </Layout>
    </>
  );
}
Adding NextAuth Package
Time to add the essential dependency: NextAuth. The docs are here, but again trust me - I’ll get us there all in one tutorial.
Run the following to install NextAuth:
npm i next-auth
Then, create pages/api/auth/[...nextauth].js and paste the following:
import NextAuth from "next-auth";
import AppleProvider from "next-auth/providers/apple";
import GoogleProvider from "next-auth/providers/google";


export const authOptions = {
  providers: [
    AppleProvider({
      clientId: process.env.APPLE_CLIENT_ID,
      clientSecret: process.env.APPLE_SECRET
    }),
    GoogleProvider({
      clientId: process.env.GOOGLE_CLIENT_ID,
      clientSecret: process.env.GOOGLE_CLIENT_SECRET,
    }),
  ],
  cookies: {
    pkceCodeVerifier: {
      name: "next-auth.pkce.code_verifier",
      options: {
        httpOnly: true,
        sameSite: "none",
        path: "/",
        secure: true,
      },
    },
  },
  callbacks: {
    session: async ({ session }) => {
      session.customValue = new Date().toISOString();
      return Promise.resolve(session);
    },
  },
}
export default NextAuth(authOptions)
Create the .env-sample file to let anyone who clones this repo know which environment variables our app is expecting to use:
APPLE_CLIENT_ID=
APPLE_SECRET=
GOOGLE_CLIENT_ID=
GOOGLE_CLIENT_SECRET=
And then copy that file into the real .env file:
cp .env-sample .env
Be sure to add .env to .gitignore - it will contain credentials that we don’t want to commit to Git!
echo .env >> .gitignore
Configuring Login with Google
Okay, here’s where it gets fun. We actually need to register our app with Google now. In exchange, they’ll give us the OAuth credentials that NextAuth needs to work.
For this part, if you get stuck, consider checking out the video that accompanies this article, which can be found at the top of the page.
The steps are roughly as follow:
Go to https://console.cloud.google.com/. Login with whatever Google account you want to use to manage your app. Agree to the Terms of Service if prompted.
Click Create Project.
Give it a name. In our case:
PageKey Auth ExampleLeave organization blank for now. Click Create.
Go to APIs & Services.
Go to Credentials.
Click Configure Consent Screen.
Click Create Credentials > OAuth Client ID.
Click configure consent screen
Click External, then click Create.
For App name, enter something like:
PageKey Auth ExampleChoose a logo file for your app.
Enter a homepage, privacy policy, and terms of service links. Example:
https://pagekey.io
https://pagekey.io/privacy
https://pagekey.io/tos
Add an authorized domain for your site. In our case:
pagekey.ioAdd your email for developer contact info.
Save and continue.
Click “Add or remove scopes.”
Add the following scopes:
.../auth/userinfo.email.../auth/userinfo.profile
Click Save and Continue.
Add your email to the list of test users.
Go back to the dashboard.
Click Credentials.
Click Create Credentials > OAuth Client ID.
For App type, choose Web application.
Enter a name. For example:
PageKey Auth Example (Web)For Authorized JavaScript origins, enter the following, replacing
pagekey.iowith your domain:http://localhost:3000 https://pagekey.io (put your domain here)For Authorized redirect URIs, enter the following, replacing
pagekey.iowith your domain:http://localhost:3000/api/auth/callback/google https://pagekey.io/api/auth/callback/googleClick Create
Copy the Client ID and paste it into
.envas the value forGOOGLE_CLIENT_ID.Copy the Client secret and paste it into
.envas the value forGOOGLE_CLIENT_SECRET.
Testing Login with Google
Let’s make sure this thing is working. We just need to update our Google button handler:
import { signIn } from 'next-auth/react';

const handleLoginWithGoogle = () => {
  signIn("google");
};
Then, we’ll reconfigure the logic a bit:
import { signIn, signOut, useSession } from 'next-auth/react';
const { data: session } = useSession();
...
let loginElem = (
<>
<button className="m-4p-3 bg-blue-600 text-white font-bold rounded" onClick={() => handleLoginWithGoogle()}>Login with Google</button>
<button className="m-4 p-3 bg-blue-600 text-white font-bold rounded" onClick={() => handleLoginWithApple()}>Login with Apple</button>
</>
);
if (session && session.user) {
loginElem = (
<div>
<div>
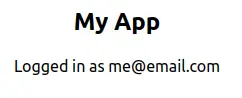
Logged in as {session.user.email}
</div>
<button onClick={() => signOut()}>Logout</button>
</div>
);
}
return (
<>
<div className="text-2xl font-bold my-4">My App</div>
{loginElem}
</>
);
Oops! Looks like we need a SessionProvider
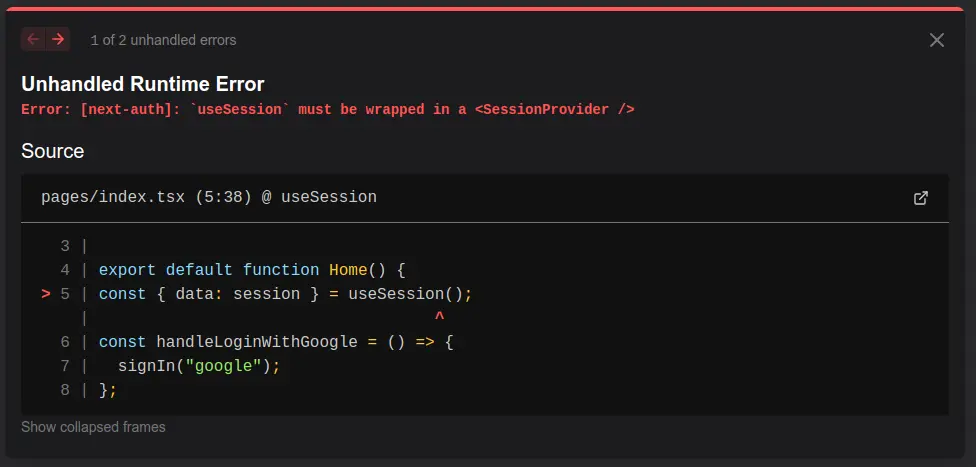
This is a quick fix. We’ll just update _app.tsx like this:
import { SessionProvider } from 'next-auth/react';
...
      <SessionProvider>
        <Layout>
          <Component {...pageProps} />
        </Layout>
      </SessionProvider>
...
Now try logging in with Google.
It should work!
Configuring Login with Apple
Of course this is going to be a pain.
Login to developer.apple.com
Go to Account
Click Identifiers
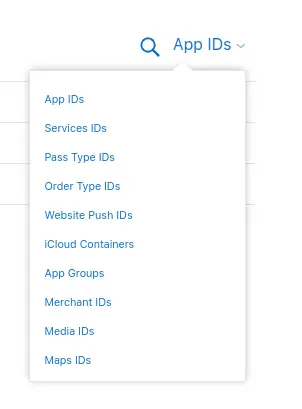
In the top right, click App IDs and change it to Services IDs. (Ridiculously tricky step)
Click the plus to register a new Services ID.
Click continue. Ad a description and identifier.

Click your new service id.
Click “Enabled’ next to “Sign in with Apple”.
Click “Configure”
Select your primary app id - assumption is that you have already created this elsewhere
For domains, put your web domain -
boom.pagekey.iofor me.In return URLs, put something like
https://boom.pagekey.io/api/auth/callback/apple. Replaceboom.pagekey.iowith the domain where you’ll host your app.Click Done.
Generating the Key, Getting the Secret
Now we have to get the APPLE_CLIENT_ID and APPLE_SECRET environment variables. Unfortunately, Apple makes this pretty complicated. We’ll start by generating a key.
Go to Keys on Apple Developer.
Click the plus to create a new key. Give it a name. Click Sign in with Apple. Click Configure. Select your app from the list. Click Save. Click Continue. Click Register.
Note the Key ID - copy it into a note, you’ll need it later. Then press Download.
Open the private key file that just downloaded in a text editor. It should look something like this:
-----BEGIN PRIVATE KEY-----
MIGTAgEAMBMGByqGSM49tgEGCCqGSM49AwEHBHkwdSIBAQQg6XgE1Gh6AOA6ShuR
Pomi8sUETCJ7jxBL154Ud+a2OgCgYIKoZIzj0DArehRANCAARF4FKAbPdpTvR5
Q5fGoR2tKBYmV4HX/uOkPVu3CIL4lwKaAqOqop5FQ3I4lV7JKQ0tgAytx8JKn9NL
NgQlPaby
-----END PRIVATE KEY-----
Paste the key into your terminal like this:
export APPLE_PRIVATE_KEY="-----BEGIN PRIVATE KEY-----
MIGTAgEAMBMGByqGSM49tgEGCCqGSM49AwEHBHkwdSIBAQQg6XgE1Gh6AOA6ShuR
Pomi8sUETCJ7jxBL154Ud+a2OgCgYIKoZIzj0DArehRANCAARF4FKAbPdpTvR5
Q5fGoR2tKBYmV4HX/uOkPVu3CIL4lwKaAqOqop5FQ3I4lV7JKQ0tgAytx8JKn9NL
NgQlPaby
-----END PRIVATE KEY-----"
Note: If you have problems with this, you can also try replacing all line breaks with
\\nand see if that helps.Look in the top right corner of Apple Developer to locate your Team ID.

Copy this script into the
scriptsfolder of your project and run it like this:chmod +x ./scripts/apple-gen-secret.mjs export APPLE_KEY_ID=paste-your-key-id-from-above export APPLE_TEAM_ID=paste-your-team-id export APPLE_CLIENT_ID=io.pagekey.boom # replace with your domain # note that APPLE_PRIVATE_KEY has already been set above ./scripts/apple-gen-secret.mjs --kid $APPLE_KEY_ID --iss $APPLE_TEAM_ID --private_key $APPLE_PRIVATE_KEY --client-id $APPLE_CLIENT_IDIt should generate something like this:
Apple client secret generated. Valid until: Thu Feb 15 2024 07:51:54 GMT-0500 (Eastern Standard Time)
eyJhbGciOiJIUzI1NiIsInR5cCI6IkpXVCJ9.eyJzdWIiOiIxMjM0NTY3ODkwIiwibmFtZSI6IlBsZWFzZSBkb24ndCBoYWNrIG1lIDopIiwiaWF0IjoxNTE2MjM5MDIyfQ.yNMm_loH6ybgHaRkKlPlbPf6pPoYH3ajvDLpBjUdYNk
Copy that entire token starting with
ey. Now we have all the data we need to fill out our .env file!APPLE_CLIENT_ID=io.pagekey.boom # replace with your domain APPLE_SECRET=eyJhbGciOiJIUzI1NiIsInR5cCI6IkpXVCJ9.eyJzdWIiOiIxMjM0NTY3ODkwIiwibmFtZSI6IlBsZWFzZSBkb24ndCBoYWNrIG1lIDopIiwiaWF0IjoxNTE2MjM5MDIyfQ.yNMm_loH6ybgHaRkKlPlbPf6pPoYH3ajvDLpBjUdYNk
That’s pretty much all we need to do for Apple login.
There are fancy ways to test this using localhost, but I didn’t bother because I find Apple really annoying. I don’t want to generate certs, etc. So I just deploy and test on my production app. Try it out at boomlanguages.com to see it in action.
Conclusion
Thanks for following along. If you enjoyed this post, consider signing up for the PageKey mailing list to stay up-to-date with all the latest happenings of PageKey.